Tuesday 29 March 2011

final cave shaders

now that the cave is finished. i want to add the perfect shader so the environment will look as good as we imagined it in the storyboard.

here is what ive manged to do so far with a simple Phong, as you can see, its not very ice looking. more like glass. it just doesnt seem cold.


here is another attempt with the shader.


i have noticed that i keep getting stretch marks in the cave corridor and it looks really odd, i cant seem to be able to get rid of them, this is what i mean, it happens with all the shaders i apply, i think it might be my geometry doing this.


i will forget about the streach marks for now, i will upload the final cave when its finished.

Monday 28 March 2011

Modelling lamp for Heroes1.0


I have been modelling a few extra things for the kids room, today i have modelled this lamp which i have asked kofi to place on the desk.


I have used references from google to get this result. the colours are simple blinn shaders. in this image is has also been smoothed out. i made sure to sharpen the edges by adding more edge loops.


the image above shows the first finished lamp, as you can see its way too thin compared to the final one above. i thicken the lamp's supporting rods because the director wasnt sure it would fit in with the kids room

Sunday 27 March 2011

modelling cave No.3..

i have looked through my blod today and realised that i had a an idea for the cave ages ago, the ice cave from ice age fitted perfectly to what i wanted to to, here is an example


this is how i started off. i started with a polygon plane, and then added loads of divisions and selected faces at random, big and small, i then extruded them up, making sure to keep a good shape. i also run the sculpt tool at a low opacity so can keep the shape as smooth as possible.


my next step was to duplicate this geometry and mirror it above the original, i then merged all the vertexes and go this result when smoothed out. as you can see there is a slight blue to the texture, this is because i have started to play around with my own shaders. this is a simple Phong, as i know Phongs are used a lot for ice. (it wasnt very successful though..


the next step was to create a wall around my geometry, for this all i did was create a sphere and scale it to the shape of the cave pillars. i then used the sculpt tool again to deform the geometry again.


this is an experiment of one of the previous shaders i used. as you can see it doesnt look very good. i will not be using this.

test renders of the cave, and cave shader

test renders on the cave. this first one is too fast and it fails to capture the cave as a whole, i personally dont know what i was thinking when i set up the camera for this render. it was awful! you cant make out anything! i did get rid of a few light cos i think there were too many, and not only that, they were really badly placed.


this next video is my attempt to set the attributes of shader keyed tho of the camera, like the tutorial said, how ever this is what i got.


as you can see the sparkles dont change their position when the camera moves, there is slight flickering but i just think its probably my screen and not the attributes ive played with.

Saturday 26 March 2011

modelling the cave

i have started modelling the cave now, but i have found this to be very difficult, the 1st attempt i did a while back was preatty simple and not really what i think the group wants, ive planned out a new idea and will try to go with it, i have also had some work from andy but again, it doesnt give me much freedom to experiment. i will try and get as close to his idea as possible.

here is what he gave me to work from


here is what i have come up with so far, it doesnt look near enough as exciting as andy's drawing.


if you look closely i have tried to work with mudbox again to add detail to the ice, but again i havent been able to work out how to apply the shader without it going all funny and not working. it also looks really dark and boring, i might try and add some lights later on to see how it will look.


the render above is an example of the cave viewing it through a camera in maya, it makes it look bigger than it actually is, which is always a plus. Ive also introduces a light in there but i haven't done a very good job in setting it up.


this image in the other hand is much better, as you can see it has some nice sparkles from the shader i have used, i have tired to assign the camera to the shader like it said in the tutorial which i posted earlier in the week but i keep getting a really bad effect. i will post videos up soon.

Thursday 24 March 2011

Shader video

I added this video as a it tough me how to use some off the effects with the shaders in maya, what stuck out the most whas the abitlity to use a shader and create mesh from it.


he uses the ocean shader to create a mountainous environment, i could use this effect to create a rough floor for my interior shot of the cave.

Snow shader

today i came across this tutorial, it doesnt really work for what im aiming for but i believe that with a little bit of playing around i can achieve a better effects, an ice effect!


i will experiment with this method and upload my results up on here! my understanding is that there will be a sparking effect when the camera is animated, the same effect that you find when you look at snow on a sunny day. you never see the same reflective ice crystals twice.

Tuesday 22 March 2011

more and more ice shaders, but not tutorial!

Today i have found some more shaders, but again no tutorials. i really want to understand how to use the materials and nodes in maya.


here is the first one i found, i believe both of them were made by the same person.


the shader above is a very promising one, the reason for this is because the shaders allow light to bend really nicely, it also looks like it has cracks in it. one thing i dont like is that it reminds me a little too much of glass.


this one looks more like glass than the previous one, looks like a giant glass ball.
i wont be trying to imitate this effects.

Monday 21 March 2011

ice shaders for cave.

For the scene inside the cave i will have to come up with the right shaders, i cant texture it as i believe it will look terrible due to all the UV mapping that i will have to do. whereas with a shaders i can allocate it to the whole mesh and save me hours of work.

here is a tutorial which i used to start off with my shaders.


this tutorial was a little too complicated to use but i learnt a few things from it. mainly how to play around with the ocean shader, it was something which i hadnt done before. it might come in handy when testing the ocean for the start of the deep. \

this is a forum which i read through to for information on ice shaders.

http://forums.cgsociety.org/archive/index.php/t-55147.html

i have found this site called CreativeCrash.com but its not given me a way to do things, its only suppling me with the shaders. i would like to know how to do it.
i will keep looking for a tutorial.

Sunday 20 March 2011

modelling cave No.2..

So ive had a second attempt at this cave business.. and so far its not going well. ive not been happy with either two so far. this one is just the first one again with a different base and no cealing. this is what i mean, the thing i do like its the center section, perfect sleeping place for a giant ice eel ;)

here is a video of my cave


enjoy!

modelling the computer chair

we will be using a computer chair for the animation in a few weeks so kofi has asked me model this chair


this is what ive managed to do. first of all i started with a simple cube and shaped the bottom of the chair


my next step was building the base which was a two simple cylinders, one for the supporting bar and one for the base. i extruded faces from the bottom cylinder to give the chair legs.


i then wanted to make the wheels like the one in the reference image, this is what i managed to do using cylinders again.


the next step was tricky, but i managed to do it with a good result. i used a cube and extruded and shaped it in an L shape, i then added divisions using the Create Loop tool. my next step was selecting every other ring of faces on this L shape geometry. i then extruded inwards to get this, im pretty pleased with the result after i had smoothed it. looks like the back of the chair in the picture.


after adding additional bits i was left with this.


i added handles and a real plastic panel for the back rest. kofi was happy with the outcome of the chair.

more Ice Shaders

i have found more shaders in Creative Crash, they will all do the job, although some look better than others. what im really looking for is a shader that i can make myself. this way i will understand how to edit the attributes if needed in the scene.

this is an example of a shader i have found. but no tutorial so i cant make my own


as you can see the shader looks too metallic for me, I would like it to have more of a cold feel to it, more of an icy blue to it. i did find something good about this shader, i have listed it bellow, this is what i want so i wont need to UV map the cave when it comes to adding texture.

"The shader is 100% procedural which means that it uses only 3d-textures and that
there is no need to consider UV-mapping"


someone else has commented on the fact that it can look more metallic than icy.

the next image shows a shader which has been designed to work with a HDRI map, so in theory having a dark HDRI map will give me a dark ice cave effect.

this is the effect of the shader with a very light HDRI map.


HDRI map


this was the last shader i found today, it wasnt as good as the rest but i think it might do very well if used for a far away shot.


i do like how they have added an object inside the ice. looks cool and it has given me an idea. i will show it later on ;)

development of iceshaders

I have found a snow effect shader, and its a tutorial! i will attempt to work with this with the cave ive done so far. here is a few tests of what ive managed to do. as you can see it looks pretty straight forward, it looks like snow, but maybe its not the right shader for the scene, ive tested it out on a cube.

Friday 18 March 2011

Trike for Heroes1.0

We need to make the room a little more child friendly, i have already made a small toy robot but i want to add something else to it. so ive made this,


i know its nothing incredible but im happy with the outcome, it was really simple to make and it only took about an hour of work.

the only challenge i encountered while modelling this trike was the front wheel, i didnt really know how i would approach the modelling of the holes. this is what i mean


as you can see i have succeeded, the way i did this was get the right shape first, add the divisions and then delete half the wheel. the next step was to delete the faces of where i wanted the holes to be, i then selected all the edges around the deleted faces and extrude inwards in the Z axes. i snapped it to the grid and then duplicated and mirrored the geometry. i then merged the vertexes and thats what i got.

Thursday 17 March 2011

Modelling kids helmet

i have been asked to model a helmet for heroes 1.0, the helmet is part of the story, it will be part of the kids contuse when he turns super.

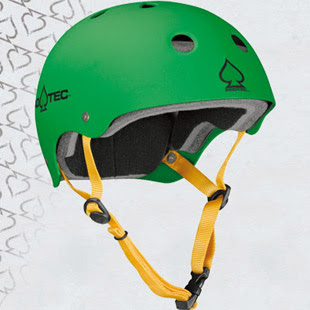
here are some references of what i must achieve.


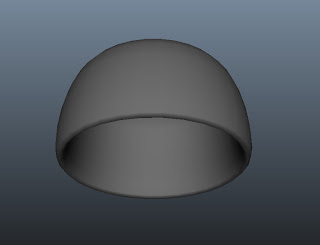
The way i tackled the issue of it being very round was simple, what i did first was create half a circle using the EP curve tool, i then duplicated the curve and made it a little smaller, i then merged these together. my next step was to Revolve the curves to create a polygon object like the one bellow.


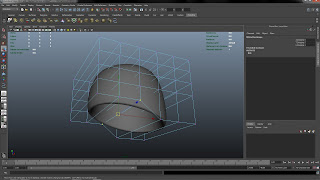
i then added a lattice to it to begin shaping it to the right shape. this was pretty simple, so i didnt bother adding an image plane to help me. my next step was to create the inside of the helmet, they usually have a soft padding in it to help them stay on your head. this was a simple polygon torus flattened out and shaped around the helmet.


the rest was pretty simple, extrude holes here and there and add some straps, chance the colour and scale it down to size :)


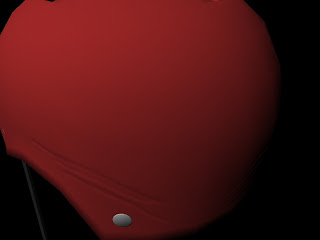
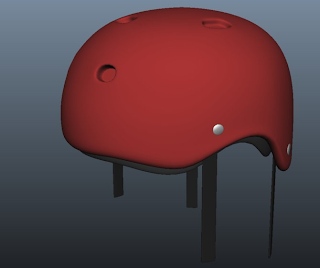
the imaga above shows who i added scratched to the mesh using a bump map, its works but we wont be using it in the final film


this next image is of the helmet smoothed out and ready to use. although u cant see it it had nCloth on the straps


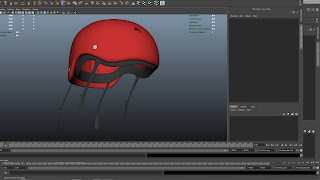
here is an image of the straps, the problem i had with the straps were that the scaling attribute in the nSolvers were going to changed when imported into others scenes so it wouldnt have worked, the other option was to rig it. this would have to be done by Clym.


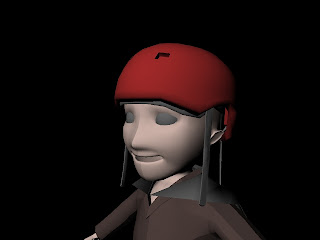
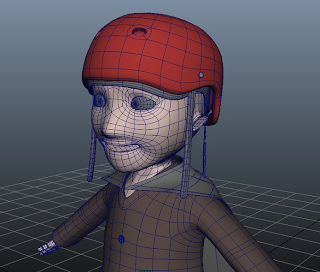
smoothed and fitted to the head, i think we can call this little project finished!

Wednesday 16 March 2011

final book textures,

here are all the book textures i used in the scene. as you can see there are a lot of them.